Graycliff Chocolatier, Nassau Bahamas

I didn’t mean to leave you. Ok, I take that back. I did mean to leave but not until I published a few more posts. But (there is always a ‘but’ isn’t there?) somehow a trip to the Bahamas consumed my every thought from January 2nd until we boarded the plane to escape the dreary cold of the Midwest.

I baked and delivered, and baked some more. I caught up on laundry, packed my bag, stocked the house with food, laid out clothes for the kids, wrote a detailed note, and left my little people and husband behind. Before long I was boarding a cruise ship with five of my closest lady-friends for a short, but restful, weekend.

Chocolatier3

The first day we arrived in Nassau, Bahamas and promptly left the ship for (what turned out to be) a long walk to Graycliff Chocolatier. The only chocolate factory in the Bahamas, it is located on the Graycliff estate which also holds a five star restaurant, mansion hotel, pool cottage and cigar factory. Said to be built in 1740, the various buildings sprawl across a small cliff and little courtyards and gorgeous tropical gardens greet you at every turn. Being the curious bunch that we are, the short walk to the chocolatier was lengthened by stops and detours along the way to view various terraces, dining rooms, and outdoor gathering spaces.

The tiny chocolate shop smelled amazing, and looked even better. The cases were lined with perfectly formed candies containing wondrous flavors such as brandy, rum, caramel, pistachio and even bacon.

Chocolatier1

We were enthusiastically greeted by two ladies. Both local Bahamians, they were obviously (and rightfully) very proud of the shop and took us through a back door to the inner workings of the company. Our guide handed around disposable hospital-gown-looking garments for the tour and proceeded to give us a thorough introduction while we adjusted our new attire.

The chocolatier is located in a converted house. We wound our way through halls, passing storage rooms, dish tanks and an office, and finally arrived in the heart of the operation. Probably once a large great room, the walls were white, ceilings high, and machinery lined the walls and made an isle down the middle. Two employees stood working at various contraptions which spewed white chocolate in beautiful ribbons.

Our time in the main production room was brief and our next stop was to an adjacent room. One half contained three pieces of machinery for processing cocoa from the bean, and the other half was lined with tables with enough place settings for our group.

Chocolatier6

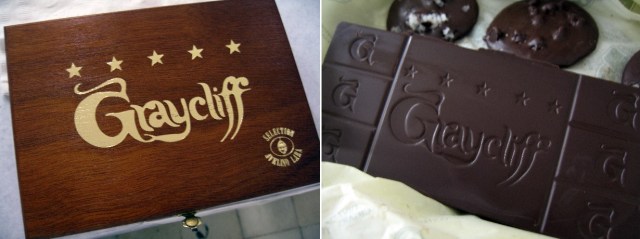
This is when the real fun began! We were given a large cup of tempered chocolate and a mold embossed with the Graycliff logo. Following our guide’s directions, we polished the mold with cotton, then poured the chocolate. A plate was provided with generous helpings of granola, coconut, chocolate chips, sliced almonds and we added our favorite flavors to our own personal bar. A few thunks of the mold on the table, and they were set aside to cool.

Chocolatier9

The rest of the chocolate was ours to be as creative as we wanted to be. I opted to make chocolate drops with various toppings.

Chocolatier10

We were given a Graycliff cigar box to package our creations and our molds containing the graycliff bar were ready to be released.

Chocolatier13

We had a fabulous time learning about the bean to bar process, getting messy with our own creations, and an even better time consuming them once back at home in the cold Midwest. With every bite I can feel the warmth of the ocean breeze, can hear the laughter of my girlfriends, and let my shoulders relax a little.

Disclaimer: I am in no way affiliated with Graycliff Chocolateir, nor have I been asked, paid or encouraged to write about it. It is simply a great little excursion I took while relaxing on a short vacation.

Corn Chowder

Corn Chowder

I stomped up the three concrete steps and swung the screen door open to the covered stoop, stopping just shy of the threshold to kick the snow off my little boots. My sister pushes me from behind, in a hurry to escape the cold. We bust through the back door and stumble into the kitchen. The warmth of my grandparent’s house overwhelms by face and the smell of pork and sour kraut on this New Year’s Day makes my nose tingle with delight.

I shed my winter clothes and pass through the kitchen and stop at the bottom of the stairs. Aunts, uncles and a few cousins lay in various states of nap across the couches and in recliners as a football game plays out on the television. Some ‘Happy New Year’ mumbles are audible as I rush up the stairs to see my favorite cousins and their new Christmas toys.

Now that I am grown, New Year’s Day traditions have developed, and yet some have stayed the same. There are still football games. Naps on the couch. Christmas toys getting a good breaking in.

The pork no longer simmers on the stove – there is a restaurant that does a better job than I ever could. And there is soup. Not just any soup. Corn chowder with Christmas ham trimmings and bursts of corn from this fall’s harvest. Simultaneously fresh and hardy, it is a terrific way to ring in the new year.

Vintage Thread and Mr. Zoot Suit shared this recipe with us and it quickly became a must-have, not only on New Year’s Day, but any wintery cold day here in the Midwest.

Ham and Corn Chowder
Ingredients:
1 tablespoon butter
2 tablespoons canola oil
1 onion (large) finely chopped
1 red bell pepper finely chopped
1 green bell pepper finely chopped
2 tablespoons flour (Gluten free option: 1 T. corn starch, 1 T. gluten free flour blend)
2 lbs potatoes pealed a diced (I use three pounds)
4 cups chicken stock (32 oz box)
4 cups water (I use six cups)
1 bay leaf
salt and pepper to taste (about ½ t each)
11 ounce can yellow corn, drained.
¼ lb diced ham (1 ½ c.)
½ c heavy cream (1/2 &1/2)
1 teaspoon liquid smoke
1-2 cups instant mashed potatoes
Paprika for garish
Preparation:
• In a heavy dutch oven melt the butter with the oil over medium heat.
• Add onion and both peppers. Cook about 5 minutes until onions are translucent.
• Add flour, stir occasionally and cook 2 minutes.
• Add potatoes. Turn heat up to high and add stock. Bring to a boil.
• Add bay leaf, salt and pepper. Turn down to a simmer, cover and leave it there for 20 minutes or until potatoes are tender.
• Add corn and simmer for 5-10 minutes.
• Remove two cups of the soup and blend in food processor, then add it back into the pot.(or, use an immersion blender for 30 seconds in dutch oven.)
• Add ham and a touch of liquid smoke. Heat through about 5 minutes.
• Remove the bay leaf and stir in cream. Adjust thickness with instant mashed potatoes and seasonings to taste. Serve hot, sprinkled with paprika.

Chocolate Caramel Surprise Cookies (Plus BONUS Gluten Free Version)

Chocolate Caramel Surprise Cookies1

It was Independence Day and we were gearing up for our annual BBQ and Ka-Boom Party. It took me a while to get everything in order since fatigue would set in without notice. Once it was finally all set, I anxiously awaited our guests, especially Spunky Girl.

Mystery Man and I had been keep my pregnancy a secret, as most people do for the first trimester. But, she was the one friend that I looked forward to sharing my news, and I knew she would keep it quiet until I was ready.

Friends and neighbors started piling in. Family by family they handed me covered dishes, grabbed a cold drink, and headed out to the heat of the back deck to the smell of meat on the grill.

The moment Spunky Girl arrived we headed upstairs to my closest for our continuous exchange of borrowed clothes. I gave here my ‘I know something you don’t’ slanted grin. She took the bait and asked what was up. As I shared the news, suddenly, her face started to change. A ‘I know something you don’t’ slanted grin came over her.

“No!”

“Yes!”

Not only were we both keeping a secret, our due dates were within two weeks.

As we shared in the journey of pregnancy, we also shared our most lethal cravings. Spunky Girl brought these cookies to me and I was hooked with the first bite. You obviously do not have to be pregnant to enjoy, but if you crave a chocolaty, salty, caramel trifecta on occasion, these are your cure.

Keep scrolling for the Gluten Free option…

Chocolate Caramel Surprise Cookies

Makes 4 dozen

Ingredients:

1 cup butter, softened
1 cup light brown sugar, packed
1 cup granulated sugar, plus 1 tablespoon
2 eggs
2 teaspoons vanilla
2 1/2 cups flour, plus 1/4 cup
3/4 cup unsweetened cocoa powder
1 teaspoon baking soda
2 Heath bars, chopped, or 1 bag Heath chips (or skip the Heath topping and opt for salt flakes)
6 rolls Rollo Caramel Chewy candies

Preparation:

  • Preheat oven to 375 degrees.
  • In a stand-mixer bowl, combine butter, brown sugar and 1 cup granulated sugar.. Mix on medium for about one minute or until mixture is fluffy, scraping down sides as needed.
  • Add eggs, one at a time. Then add vanilla. Scrape down bowl if needed.
  • In a medium bowl whisk together 2 1/2 cups flour, cocoa, and baking soda.
  • With the mixer on low, add flour mixture a small amount at a time making sure each addition is mixed in thoroughly before adding more. (if you have a splash guard for your mixer, now would be a great time to use it.)
  • Cover dough with plastic wrap and refrigerate for at least 30 minutes.
  • Place Heath pieces in a small bowl and mix with 1 tablespoon sugar.
  • Measure out chilled dough with a 2 tablespoon cookie scoop. Wrap each portion around a Rollo candy, totally encasing the candy with the dough and rolling it into a ball.
  • Press each ball into the Heath mixture, covering just 1/2 of the ball (or sprinkle the top with a bit of salt.)
  • Place three inches apart on a cookie sheet, Heath, or salt, side up.
  • Bake 7-10 minutes. Cookies should look cracked and slightly undercooked in the center.
  • Allow cookies to cool five minutes before transferring to a rack. (This is important – if you place them on the rack too soon, the caramel will run out the bottom and through the rack onto your counter.)

NOTES: Can be transformed into a chocolate/mint cookie by substituting mint Hershey kisses for the Rollos, and crushed candy canes for the Heath topping.

GLUTEN FREE Chocolate Caramel Surprise Cookies

Makes 2 dozen

Ingredients:

12 ounces semi sweet chocolate (chips, or chopped)
4 ounces gluten free flour blend**
3/4 ounce unsweetened cocoa powder
1/2 teaspoon baking soda
1/2 teaspoon salt
1/4 teaspoon xanthan gum
5 1/4 ounces (3/4 cup packed) light brown sugar
1 3/4 ounces (1/4 cup) granulated sugar
2 eggs
5 tablespoons vegetable oil
2 tablespoons unsalted butter (melted, then slightly cooled)
1 teaspoon vanilla
1/2 teaspoon instant espresso powder
2 Heath bars, chopped, or 1 bag Heath chips (or skip the Heath topping and opt for salt flakes)
(Check your Heath bar label for gluten contents!)
3  rolls Rollo Caramel Chewy* candies

* Although Rollo Caramel Chewy candies are not labeled gluten free, the ingredient list does not reflect any gluten. As always, do your own research for gluten free items and substitute accordingly.

**Gluten Free Flour Blend

24 ounces white rice flour (4 ½ cups, plus 1/3 cup) (one bag of Bob’s Red Mill brand)
7 ½ ounces brown rice flour (1 2/3 cups)
7 ounces potato starch (not potato flour) (1 1/3 cup)
3 ounces tapioca starch (also called tapioca flour) (3/4 cup)
¾ ounce nonfat milk powder (3 tablespoons)

Preparation:

  • Microwave semisweet chocolate in a bowl at 50 percent power, thirty second sessions, until melted (stirring between sessions). Let cool slightly.
  • In a separate bowl whisk together measured flour blend, cocoa, baking soda, salt and xanthan gum, set aside.
  • In a large bowl whisk together brown sugar, granulated sugar, eggs, oil, melted butter, vanilla, and espresso powder.
  • Whisk in slightly cooled chocolate. Combine until smooth.
  • With rubber spatula, incorporate the flour mixture until a sticky dough forms and no white streaks are left behind.
  • Cover bowl with plastic wrap and let dough rest for 30 minutes.
    (Do not short change the resting period of the dough, or the cookies will be slightly gritty and not as chewy.)
  • Preheat oven to 350 degrees.
  • Measure out chilled dough with a 2 tablespoon cookie scoop. I find applying vegetable spray to the scoop helps keep the dough from sticking. Wrap each portion around a Rollo candy, totally encasing the candy with the dough and rolling it into a ball.
  • Press each ball into the Heath mixture, covering just 1/2 of the ball (or sprinkle the top with a bit of salt.)
  • Place three inches apart on a cookie sheet, Heath, or salt, side up.
  • Bake 12-14 minutes. Cookies should look cracked and slightly undercooked in the center.
  • Allow cookies to cool five minutes before transferring to a rack. (This is important – if you place them on the rack too soon, the caramel will run out the bottom and through the rack onto your counter.)

NOTES: Can be transformed into a chocolate/mint cookie by substituting mint Hershey kisses for the Rollos, and crushed candy canes for the Heath topping. Again, check any substitutions for gluten contents.

Bread Pudding with Bourbon Sauce

Bread Pudding

I anxiously waited while peeking out the eat-in kitchen window. The drapes where brown and white and I would wrap them around my face and exhale on the window, making small moist spots, and watch them disappear. She always came to pick us up on Friday afternoons. I can’t remember a Friday in my childhood that her car didn’t climb the gravel driveway, and I didn’t bound to the back door to let her in. Grandma was taking us for a sleepover.

Our first stop would be dinner. One of our favorite places was a little green and white building in town along the route to her house. Empire Restaurant. My sister and I would fight over who got to sit by her, order soda, because we were never allowed soda otherwise, and I insisted on the fried fish with french fries. Again.

The end of dinner was always the same. “Eat more of your fish and you can have bread pudding”.  “No, I said fish, not french fries. You have to eat the fish.” I would do anything for the bread pudding and she knew it.

Unfortunately, Empire closed it’s doors and it would be years before the taste of perfect bread pudding would cross my mouth again. There were glimmers of hope along the way. A Mom and Pop cafe here, a chain restaurant there. I would see it on the menu and get all giddy with the excitement, then the let-down would come. Mushy, tasteless, drowned in too much sauce. It was never the same.

One day R & S called and invited us out to a neighborhood pub. We had been there before and I had seen the teaser of bread pudding on the menu, but had lost all hope and declined to order it time and time again. R & S insisted it was all that bread pudding was supposed to be, and who was I to argue – they are British after all. So, I took a chance.

The fork passed my lips and I suddenly felt like a child again, and for a moment I panicked because I hadn’t finished all my fish.


I found this recipe after our local Pub closed and I was missing this dessert. A extensive search for that recipe turned up an article written in the early nineties and there it was! I have since made a few changes, and the Pub’s other locations no longer serve it with this sauce. 

Bread Pudding

Ingredients:

1 loaf Challah bread, cubed (about 9 cups)

1/2 lb butter (2 sticks)

3 eggs, beaten

1/2 cup raisins

1/2 cup chopped walnuts

1/4 cup Light Brown Sugar

1 can evaporated milk (12 fl. oz.)

1 1/4 Cup Sugar

1 Small Can Crushed Pineapple (8 oz, do not drain)

3 Tablespoons Vanilla Extract

1/2 Teaspoon Nutmeg

¾ cup chopped walnuts (optional)


Topping:

2 tablespoons light brown sugar

1 tablespoon granulated sugar

Combine topping in a small bowl. Set aside.

Preparation:

  • Preheat oven to 325 degrees
  • Reserve 2 cups of bread cubes, set aside.
  • Using two baking sheets, spread remaining bread cubes in one single layer.
  • Toast in oven for 15 minutes, tossing once half way through, and rotating baking sheets to opposite racks.
  • Place in a large bowl, set aside to cool.
  • Melt the butter and pour over bread cubes.
  • In a medium bowl combine all remaining ingredients and pour over bread crumbs. Stir gently with a rubber spatula and let stand for ten minutes.
  • Pour mixture into well-buttered 8”x11” baking dish.
  • Spread reserved bread cubes over top, slightly pressing them in. Sprinkle sugar topping evenly over the pudding.
  • Bake for 40 to 50 minutes until a knife inserted in the center comes out clean.
  • Cool for a minimum of 20 minutes before serving with Bourbon Sauce.


Bourbon Sauce

Ingredients:

1/4 cup (1/2 stick) unsalted butter

1/2 cup sugar

3 tablespoons whipping cream

2 tablespoons bourbon

Pinch of salt

Preparation:

  • Melt butter in small saucepan over medium heat.
  • Whisk in remaining ingredients.
  • Simmer until thickened, whisking often, about 3 minutes.
  • Cool slightly and add bourbon. Serve over warm Bread Pudding.

Rosemary Citrus Turkey

Miso Turkey

When Mystery Man and I built a house an acquaintance of ours warned us it could be the beginning of the end of our marriage. What she didn’t know was how like-minded the two of us are. I think we are the only people on the planet that actually enjoyed the process. Choosing the structural plan, flooring, cabinets, fix­tures, and brick color were all a breeze. Visiting the job site every day, we were excited to see even the smallest progress. It was a fantastic time.

The most fun was moving in, especially the kitchen. I could actually stretch out my arms in every direction and touch nothing but air. A far cry from the tiny apart­ment kitchens I had endured for the last seven years. It even had a pantry. A pantry!

I looked forward to messing it up, cleaning it up, and preparing exquisite meals for our friends and family. I especially could not wait to break in the new shiny double oven with a convection fan and a control panel that looked like the Star Ship Enter­prise.

For two years I baked and baked. Cookies, breads, cakes, potatoes, and casseroles. The only thing I did not make well was meat. Any kind of meat. When I did, it was tough. Over­cooked. Chewy.

I blame my father.

I know that sounds unfair. Just throwing blame on him because that is what people do to their parents when they fail. But seriously, it’s HIS fault.

You see, my father liked his meat very, very well done. If there was a tint of pink left he was unhappy. Many of waiters grimaced, eye-rolled and sighed as they walked from the table with a rejected steak. At home he would fire up the grill and cook the meat his way, there was never a question of how you liked yours. So this is how I learned, by watching him. Like I said it’s my father’s fault, God love ‘em.

Then one day everything changed. Mystery Man and I were preparing for a holiday dinner party and I wanted to make a turkey. Deciding that a good quality digital meat thermometer was my ticket to a perfectly cooked bird I started researching the best brands. Deciding on one, I presented Mystery Man with my choice and told him of my intentions of a trip to Williams Somoma the next day.

That is when he said to me “Don’t we have one of those in the drawer? It came with the oven.”

“Uh, what?!” I walked over to the oven and stared at the Star Ship Enterprise panel. There, under the timer button was the word ‘Probe’. That November I perfected turkey with the help of hours of internet searches, a good brine, and a meat thermometer that had been there all along.

Rosemary Citrus Turkey

Ingredients:
One 12-15 pound turkey (Remove stray quills, neck and giblets. Set aside for another use if desired.)

Brine
1 gallon water
3/4 cup kosher salt
1/2 cup granulated sugar
2 tablespoons dried rosemary
1 tablespoon caraway seed
1 tablespoon garlic powder
2 teaspoons black pepper

Roasted Turkey
1 Large Onion. (peeled and sliced 1 inch thick, separated into rings)
2 Tablespoons fresh Rosemary (or 1 Tablespoon Dried Rosemary)
1 Garlic Clove (through a garlic press, or grated on a micro-plain.)
1 Teaspoon Black Pepper
1 Teaspoon Poultry Seasoning
1/2 Cup Miso Paste* (this can be found in a plastic squeeze bottle in the Asian food isle)
*to make this gluten free, substitute plan hummus
1/2 Cup Unsalted Butter
2 Lemons (1 sliced 1/4 inch thick into rings. 1 quartered.)
1 Red Bell Pepper (Seeded and sliced into 1/4 inch thick rings)
1/2 Teaspoon Seasoned Salt
1 Orange (Quartered)
2 Tablespoons Olive Oil
1 Tablespoon Flour
3 Celery Stalks (including leaves, chopped into 1 inch pieces.)

Equipment:
1 Large Poultry Bag (Reynold’s oven roasting bag)
Large roasting pan with rack insert
Kitchen twine
Turkey lacers
Large soup kettle for brining

Preparation:

Brining the turkey

•    When to start. Twelve hours + the recommended roasting time + thirty minutes rest time.  Please be aware that this is really a ‘stuffed’ turkey, so allow for the recommended time for a stuffed bird on cooking charts. (Meat thermometer temperature should register 180 degrees at the thickest area of the thigh.)

12-16 lbs = 2 to 2 1/2 hours

16-20 lbs = 2 1/2 to 3 hours

20-24 lbs = 3 to 3 1/2 hours

•    In a large pot mix together water, salt, sugar, rosemary, caraway, garlic and pepper. Stir well to dissolve all sugar and salt.
•    Add the turkey, breast side down (if possible). Add water to cover entire bird, if necessary. Refrigerate for 12 hours. (In a pinch for refrigerator space? In Ohio, the weather normally permits leaving the turkey in the cold garage.  If need be, a large cooler and a plastic water-tight bag can be used to brine the turkey if you are not in a cold climate. Pack ice around the bagged turkey and secure the lid.)

Roasting the turkey

The following can be completed one day in advance:
•    Prepare the Onion as described. Put about 1/4 of the Onion in a food processor.  Place the remaining in a gallon zipper-sealed bag and refrigerate.
•    To the food processor add the rosemary and garlic. Pulse until finely chopped, just short of becoming a paste.
•    Add black pepper, poultry seasoning and miso paste (or hummus) to the food processor mixture and pulse until smooth. Add melted butter and blend well. This mixture will appear curdled, and that’s ok. Cover and refrigerate at least 30 minutes, and up to a day in advance.
•    Prepare the 2 Lemons, Red Bell Pepper, Orange and Celery as described. Add to the  gallon zipper-sealed bag (with onion) and refrigerate for later use.

When you are ready to roast:
•    Place oven rack in lowest position and preheat to 350 degrees.
•    Rinse turkey and place on a large cutting board, or clean work surface. Pat dry with paper towels.
•    Working from the large cavity, run fingers under the skin to loosen. Try to loosen the skin from the meat in the breast, thigh and drumstick areas without tearing the skin.
•    Once all the skin is loosened, push the miso (or hummus) butter into these areas using a spoon, your fingers, or any combination of the two. This is a messy task, but the more chilled the butter mixture is, the easier it will be to deal with.
•    Take the bag of produce your prepared earlier out of the refrigerator.
•    Place a lemon slice inside a pepper ring and slide it under the skin with the butter mixture. Repeat, one on each breast, and one on each drumstick. Use remaining lemon and pepper slices to fill in any empty gaps.
•    Sprinkle turkey cavity with seasoned salt and stuff with lemon and orange quarters, squeezing juice into the cavity as you go.
•    Fold the neck skin up over the cavity and secure in place with turkey lacers or long toothpicks. Tie the drumsticks together with kitchen string and tuck the wings under the body, using  turkey lacers if needed.
•    Rub the turkey skin with olive oil.
•    Place flour in oven roasting bag and shake it around.
•    Place bag on roasting rack (which is nested in the roasting pan) and layer the bottom of the bag with onion and celery slices (and any other produce left over).
•    Place turkey in oven roasting bag and close it with the tie provided.
•    Roast until a meat thermometer temperature should register 180 degrees at the thickest area of the thigh. Remove from oven and let the bird rest for thirty minutes.
•    Carve the turkey and enjoy!

Meaty Minestrone Soup (Gluten Free)

Minestrone

1993

I laid there in my bed listening to the rain drum down on the farmhouse metal roof. The noise a constant low vibration with water dribbles making their way down the gutters. My room sat above the family room and every night I could here Dad thunk his recliner foot-rest into the chair and walk to the kitchen for his ice cream bed-time snack.

The savory air from dinner still hung in the air. It was full-on Autumn and the temperatures where plummeting. They were even calling for snow on Halloween this year. 

2014

The pond beyond my backyard is rippling with rain drops and the leaves are disappearing from the trees with help of the stiff breeze. My baby girl is singing in her bed, determined out out-wit nap time. My son is crunching away on his after school popcorn snack. I wonder if his second loose tooth will make it through the day or if a Golden Dollar will make it’s way under his pillow tonight. It is full-on Autumn and the temperatures are plummeting. They are even calling for snow. It’s Halloween. Time for some warm soup.

Meaty Minestrone Soup

Ingredients:
1 pound hot sausage, removed from casings
1 1/2 cup chopped onion
1 cup diced carrots
1 small zucchini, chopped
1 cup chopped celery
1 can green beans (reserve liquid)
1 can hot and spicy chili beans (check label for gluten)
1 (14.5 ounce) can diced tomatoes
2 cups beef stock
2 cups water
2 cups gluten free pasta or prepared rice, cooked per package directions.

Preparation:
• In a large dutch oven or heavy pot over medium-high heat, brown spicy sausage until no longer pink, drain if needed, add onions and cook until softened.
• Add carrots, zucchini and celery. Stir to combine.
• Add (including all liquid) green beans, chili beans, diced tomatoes, beef stock and water.
• Stir and bring to a boil over high heat.
• Turn heat down to simmer and cook for three hours, stirring occasionally.
• Serve in individual bowls topped with cooked pasta or rice. (Do not add pasta to soup until serving.)

• Notes:
This soup is spicy, but for an extra kick use spicy or Italian green beans and/or spicy tomatoes.

Perfect for the slow cooker! Brown sausage and soften the onions. Add to crock pot with all other ingredients. Set crock pot on High for 4-6 hours.

Sweet Potato, Apple, Cranberry. Perfect Trifecta.

Sweet Potato Side2

Because I have an undying love for apples, I have decided to continue the trend and share another recipe featuring these autumn beauties. 

The other day I was talking with a friend and she mentioned how overwhelming it can be in the produce department with all the new apple varieties. “What ever happened to Yellow Delicious, Red Delicious and Granny Smith?” While I agree that it can be confusing, please remember that in general, apples are apples. I know, I know. I am about to be burned at the stake by foodies near and far. But, I really do think that some of us (even me, on occasion) get hung up on the small stuff. This is the time of year apples are cheap, so if you haven’t heard of that-variety-over-there before, pick one out, take it home and give it a taste. Is it sweet? Sour? Bitter? Crunchy? Soft? Most importantly, do you honestly like it?

My friend listened to my answer, smiled, then asked if I could just help her skip to the end of the process and tell her what to buy. I figured she is not alone, so I put together this list to help.

 There are over 7,500 apple varieties.

I have scavenged my local grocery stores and listed the most widely available here in the mid-west.

* Indicates variety can be used for either baking or sauce, but they appear in the category where they perform the best.

Baking Apples

*Braeburn, *Cortland, Fuji, Gala, Golden Delicious, Granny Smith, Honeycrisp, Melrose, Mutsu, Northern Spy, Pink Lady, Rhode Island Greening, Rome Beauty, *Winesap

Sauce Apples

Gravenstein, Ida Red, *Jonamac, *Jonathan, Liberty, *Maiden Blush, McIntosh, *Newtown Pippin (should be cold-stored for 1-2 months before eaten to reduce bitterness), *Snow

AND NOW FOR THE RECIPE…

Sweet Potato Side

Sweet Potato, Apples & Cranberries

Makes 4 (small) servings

Ingredients:
2 medium sweet potatoes, peeled and cut into bit-sized pieces
1 medium granny smith apple, cored, peeled, and diced into 1/2 inch pieces
2 tablespoons dried cranberries
1 1/2 tablespoon butter
1 tablespoon brown sugar
3/4 teaspoon salt
1/2 teaspoon cinnamon

(sugar and cinnamon for dusting)

Preparation A:
• Mix all ingredients together.
• Place in a Ziploc brand steamer bag and seal.
• Microwave on high for 8-9 minutes or until sweet potatoes are fork-tender.
• Allow bag to stand for 1 minute before pour contents into a serving dish.

Dust with sugar and cinnamon to taste.

OR

Preparation B:
• Mix all ingredients together.
• Place in sauce pan and add 1/4 cup water. Cover.
• Steam over medium heat for 20 minutes or until sweet potatoes are fork-tender.
• Remove from heat and let stand for 1 minute before transferring to a serving dish.

Dust with sugar and cinnamon to taste.

Spiced Applesauce Snack Cake (Gluten Free)

Applesauce Cake

I often wonder why pumpkins get all the glory in the fall. Maybe it’s because the green mermaid company started squirting the flavor in everything, or maybe it goes all the way back to that little cartoon-kid and his obsession with the ‘great’ one. However it started, I find it disheartening that the ‘other’ fall flavor doesn’t get much credit.

Growing up at the farm house, my spring, summer, and fall were filled with visions of apple blossoms, bees, buds, and finally tiny round green promises that I watched grow into big beauties.

In the fall our lawn was never mowed in the straight lines and patterns that I so often enjoyed creating on the John Deere. Instead, there where zigzags. Swaths of grass cut on strange angles were evidence of my trips back and forth to the tree line so I could pick another snack off a low branch. The neighbor’s horse benefited, too. A handful of imperfect apple always made it across the fence to old JoAnn as I roared by.

We had many varieties of trees. Early apples, mid-season, and late, we were rarely without the fruit from August through October. This translates to a lot of apple recipes in my family. Here is one of the most recent – don’t let the Gluten Free label put you off, it will surprise you, and delight you. Maybe we can all work together and give the apple her glory days back.

John Deere

Spiced Applesauce Snack Cake

Ingredients

7 ½ ounces gluten free flour blend*

2 teaspoons baking powder

1 teaspoon baking soda

¼ teaspoon xanthan gum

3 large eggs

½ cup granulated sugar (3 ½ ounces)

¼ cup light brown sugar (packed) (1 ¾ ounces)

½ teaspoon salt

½ teaspoon cinnamon

¼ teaspoon nutmeg

1/8 teaspoon cloves

4 tablespoons butter, melted and cooled

¾ cup applesauce (unsweetened)

1 teaspoon vanilla

(Optional – local apple butter for topping.)

*Gluten Free Flour Blend

24 ounces white rice flour (4 ½ cups, plus 1/3 cup) (one bag of Bob’s Red Mill brand)

7 ½ ounces brown rice flour (1 2/3 cups)

7 ounces potato starch (not potato flour) (1 1/3 cup)

3 ounces tapioca starch (also called tapioca flour) (3/4 cup)

¾ ounce nonfat milk powder (3 tablespoons)

Preparation

Preheat oven to 350 degrees and set oven rack in the center position.

Lightly grease one 8 inch square cake pan, or two bread loaf pans. Cut parchment paper to fit the bottom of pan(s) and line the bottoms. Lightly grease parchment as well.

Whisk together gluten free flour blend, baking powder, baking soda and xanthan gum in a small bowl. Set aside.

In a large mixing bowl (do not use stand mixer for this recipe) whisk eggs, sugars, salt, cinnamon, nutmeg and cloves until well combined and eggs are light in color. Slowly add melted butter while whisking until combined. Incorporate apple sauce and vanilla. Last, add the dry flour mixture and thoroughly combine. Mixture should be smooth.

Pour batter into prepared pan(s). Bake until cake tester comes out clean – about 30 minutes – rotating pan(s) half way through baking time.

Cool completely before storing. Cake can be wrapped in plastic wrap and stored for up to three days in the refrigerator.

Meaty Marinara Sauce (Gluten Free) (Slow Cooker)

It’s so good I missed the photo op…

_DSC0498

There are several things that makes this Meaty Marinara Sauce one of my go-to meals. First off, it uses one of my favorite things – a slow cooker. Second, my other business is on full throttle, and that means I have little to no time to put a meal on the table every night. But since I have expensive taste, going out to dinner regularly is not healthy for the wallet, let alone my waist line. The third and final reason? I think I was Italian in another life.

My friend Vintage Thread gave me the original recipe and, me being me, couldn’t leave well enough alone. So I tweaked it here and there, and now I make it in large quantities and freeze it in four-person portions. It’s quick, easy, and hearty. Just what we need right now in the Midwest where the weather seemed to take summer, pole vault right over fall, and land us firmly in winter.

_DSC0497

Meaty Marinara Sauce

Ingredients:
1/2 lb ground beef
1/2 lb spicy sausage
1/2 lb ground turkey
1 onion, diced
2 – 15 ounce cans tomato sauce (Hunt’s brand or better)
2 – 12 ounce cans tomato paste (Hunt’s brand or better)
2 envelopes (approximately 1.5 ounces each)Italian spaghetti sauce seasoning mix (McCormicks or Lawry’s brand)
1 tablespoon sugar
1 teaspoon oregano (freshly minces, or dried)
1 clove garlic (pushed through a press, or minced very fine)
1/2 teaspoon salt
1/4 teaspoon pepper
1 teaspoon Lawry’s Seasoned Salt
4 cups water

Preparation:
•    In a large skillet over medium heat, brown the meat until no longer pink. Cook the onions until soft and translucent. Drain well and transfer to slow cooker.
•    Stir in all remaining ingredients and set slow cooker on Low for 8 hours.
•    Serve with pasta and top with Romano or Parmesan cheese.

NOTES:
Freeze left overs in one cup servings for later use. To thaw, place in refrigerator overnight or microwave for 2 minutes at 50% power. Transfer to sauce pan to heat on stove top until pasta is ready and sauce is hot.

Italian Meatballs (Gluten Free)

Meatballs1

My 16th birthday was just one week away. The big day included an appointment at the local BMV for my driver’s test, an appointment at the orthodontist to remove my three-year-old braces, and most importantly, I planned to go job hunting.

You see, a few weeks prior, I attended a meeting at my school for the foreign language club and learned of a twenty-one-day European tour offered to their members. I had the itinerary memorized.

(…and I still do…Land in Madrid, via New York City. Take a night train to Paris. Ride a tour bus and stop in Lucerne, Switzerland, head south into Italy and stop in Florence, Sienna, and Rome. Make our way back north to Venice, then skip over to Austria and see Innsbruck. Germany is next with a stop in Munich and Frankfurt. Skip up to the Netherlands and say hello to Amsterdam then hop on the ferry over to England and spend a day in London. Pack our bags for good and head home.)

That evening I took all the brochures home to my parents to plead my case. In my mind, the fact that I would be the first to have this awesome opportunity to travel parts of the world only my Grandfather had seen during the war was a no brainer. They should say “yes”, sign up for the payment plan, and in nine months I would be on my way.

Instead, they said nothing. They looked at one another. My Dad looked at Mom, then mumbled to me “No way we can pay for this. Get a job and pay for it yourself.” That was the end of the discussion*.

So, I needed a job.

First stop. Bob Evans restaurant. I had on my Sunday best, I couldn’t stop smiling from the new feeling of smooth teeth, and I marched on in there and handed the manager my application. He hired me on the spot. Just three shifts a week, but it was a start.

I trained, learned, became a shift leader, and everyone knew I would pick up any hours available. Six months later, all the installment payments were made and the remaining three months I worked for spending money.

The summer between my Sophomore and Junior year of high school became a journey of a lifetime, and this is precisely when I fell in love with anything and everything Italian. Especially the food.

It was seven years before I found a meatball in my hometown that rivaled those in my fond memories. Mystery Man and I stumbled upon a hole-in-the-wall Italian place named “Armando’s Italian Market”. We became so well known in the joint that Lady Linda at the front counter covertly shared his Italian Meatball secrets with us. After Armando retired and closed the place down, we set our minds to making them ourselves.

*One week before jetting off to Europe at the age of sixteen, Dad approached Mom and told her they could not possibly let me go – I was too young, naive, and had never traveled more than one state from my hometown. He was not serious when he told me to get a job. That was his way of saying “no”.  While Mom agreed, she would not let my hard work go without reward and she

Here they are!

*While Armando’s were not Gluten Free, I have adapted this recipe to meet my dietary needs.


Meatballs4


Spicy Italian Meatballs
Makes approximately 72 (2 ounce) meatballs


Ingredients:
3 lbs ground beef
3 lbs spicy Italian sausage (casings removed)
3 c. Romano Cheese (grated)
3 c. Dry Italian Bread Crumbs (One whole loaf of Udi’s white sandwich bread, and various spices. See instructions below.)
6 eggs
6 cloves garlic

Canola Oil for Deep Fryer


Preparation:
•    Pour canola oil into deep fryer to the ‘fill’ line. Heat to 300 degrees.
•    Working in small batches at a time, place 1/2 pound ground beef, 1/2 pound spicy Italian sausage, 1 cup Romano cheese, 1 cup bread crumbs, 1 egg and 1 clove of grated garlic in a large food processor. Combine for approximately 15 seconds (or mix by hand in a large bowl).
•    Roll into 2” balls. (I weigh them into 2 ounce portions)
•    Place on a rimmed baking sheet.
•    Using tongs, place meatballs into fryer basket, being careful not to overcrowd.
•    Fry for five minutes.
•    Remove from the fryer and place on cooling rack nested in a rimmed baking sheet.
•    Repeat with remaining meatballs.
•    Place number of desired meatballs into saucepan with marinara sauce, heat through and serve.


NOTES:
Use only Romano cheese.

To freeze meatballs, let them cool completely and portion desired amount in quart size freezer bags. Thaw directly in warm marinara sauce.

Make your own bread crumbs:
Place 1/4 Udi’s bread loaf in food processor. Pulse until all bits and pieces are smaller than a pea. Add Italian seasonings, such as Oregano, Thyme, Basil, Garlic Powder, etc. Toss crumbs with olive oil and spread out over two rimmed baking sheets. Bake at 400 degrees until brown. Cool completely before using. (Freeze any leftover crumbs for other recipes.)