When Mystery Man and I built a house an acquaintance of ours warned us it could be the beginning of the end of our marriage. What she didn’t know was how like-minded the two of us are. I think we are the only people on the planet that actually enjoyed the process. Choosing the structural plan, flooring, cabinets, fixtures, and brick color were all a breeze. Visiting the job site every day, we were excited to see even the smallest progress. It was a fantastic time.
The most fun was moving in, especially the kitchen. I could actually stretch out my arms in every direction and touch nothing but air. A far cry from the tiny apartment kitchens I had endured for the last seven years. It even had a pantry. A pantry!
I looked forward to messing it up, cleaning it up, and preparing exquisite meals for our friends and family. I especially could not wait to break in the new shiny double oven with a convection fan and a control panel that looked like the Star Ship Enterprise.
For two years I baked and baked. Cookies, breads, cakes, potatoes, and casseroles. The only thing I did not make well was meat. Any kind of meat. When I did, it was tough. Overcooked. Chewy.
I blame my father.
I know that sounds unfair. Just throwing blame on him because that is what people do to their parents when they fail. But seriously, it’s HIS fault.
You see, my father liked his meat very, very well done. If there was a tint of pink left he was unhappy. Many of waiters grimaced, eye-rolled and sighed as they walked from the table with a rejected steak. At home he would fire up the grill and cook the meat his way, there was never a question of how you liked yours. So this is how I learned, by watching him. Like I said it’s my father’s fault, God love ‘em.
Then one day everything changed. Mystery Man and I were preparing for a holiday dinner party and I wanted to make a turkey. Deciding that a good quality digital meat thermometer was my ticket to a perfectly cooked bird I started researching the best brands. Deciding on one, I presented Mystery Man with my choice and told him of my intentions of a trip to Williams Somoma the next day.
That is when he said to me “Don’t we have one of those in the drawer? It came with the oven.”
“Uh, what?!” I walked over to the oven and stared at the Star Ship Enterprise panel. There, under the timer button was the word ‘Probe’. That November I perfected turkey with the help of hours of internet searches, a good brine, and a meat thermometer that had been there all along.
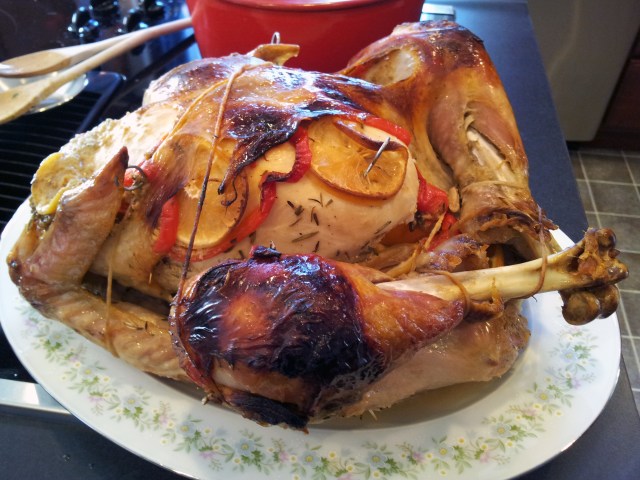
Rosemary Citrus Turkey
Ingredients:
One 12-15 pound turkey (Remove stray quills, neck and giblets. Set aside for another use if desired.)
Brine
1 gallon water
3/4 cup kosher salt
1/2 cup granulated sugar
2 tablespoons dried rosemary
1 tablespoon caraway seed
1 tablespoon garlic powder
2 teaspoons black pepper
Roasted Turkey
1 Large Onion. (peeled and sliced 1 inch thick, separated into rings)
2 Tablespoons fresh Rosemary (or 1 Tablespoon Dried Rosemary)
1 Garlic Clove (through a garlic press, or grated on a micro-plain.)
1 Teaspoon Black Pepper
1 Teaspoon Poultry Seasoning
1/2 Cup Miso Paste* (this can be found in a plastic squeeze bottle in the Asian food isle)
*to make this gluten free, substitute plan hummus
1/2 Cup Unsalted Butter
2 Lemons (1 sliced 1/4 inch thick into rings. 1 quartered.)
1 Red Bell Pepper (Seeded and sliced into 1/4 inch thick rings)
1/2 Teaspoon Seasoned Salt
1 Orange (Quartered)
2 Tablespoons Olive Oil
1 Tablespoon Flour
3 Celery Stalks (including leaves, chopped into 1 inch pieces.)
Equipment:
1 Large Poultry Bag (Reynold’s oven roasting bag)
Large roasting pan with rack insert
Kitchen twine
Turkey lacers
Large soup kettle for brining
Preparation:
Brining the turkey
• When to start. Twelve hours + the recommended roasting time + thirty minutes rest time. Please be aware that this is really a ‘stuffed’ turkey, so allow for the recommended time for a stuffed bird on cooking charts. (Meat thermometer temperature should register 180 degrees at the thickest area of the thigh.)
12-16 lbs = 2 to 2 1/2 hours
16-20 lbs = 2 1/2 to 3 hours
20-24 lbs = 3 to 3 1/2 hours
• In a large pot mix together water, salt, sugar, rosemary, caraway, garlic and pepper. Stir well to dissolve all sugar and salt.
• Add the turkey, breast side down (if possible). Add water to cover entire bird, if necessary. Refrigerate for 12 hours. (In a pinch for refrigerator space? In Ohio, the weather normally permits leaving the turkey in the cold garage. If need be, a large cooler and a plastic water-tight bag can be used to brine the turkey if you are not in a cold climate. Pack ice around the bagged turkey and secure the lid.)
Roasting the turkey
The following can be completed one day in advance:
• Prepare the Onion as described. Put about 1/4 of the Onion in a food processor. Place the remaining in a gallon zipper-sealed bag and refrigerate.
• To the food processor add the rosemary and garlic. Pulse until finely chopped, just short of becoming a paste.
• Add black pepper, poultry seasoning and miso paste (or hummus) to the food processor mixture and pulse until smooth. Add melted butter and blend well. This mixture will appear curdled, and that’s ok. Cover and refrigerate at least 30 minutes, and up to a day in advance.
• Prepare the 2 Lemons, Red Bell Pepper, Orange and Celery as described. Add to the gallon zipper-sealed bag (with onion) and refrigerate for later use.
When you are ready to roast:
• Place oven rack in lowest position and preheat to 350 degrees.
• Rinse turkey and place on a large cutting board, or clean work surface. Pat dry with paper towels.
• Working from the large cavity, run fingers under the skin to loosen. Try to loosen the skin from the meat in the breast, thigh and drumstick areas without tearing the skin.
• Once all the skin is loosened, push the miso (or hummus) butter into these areas using a spoon, your fingers, or any combination of the two. This is a messy task, but the more chilled the butter mixture is, the easier it will be to deal with.
• Take the bag of produce your prepared earlier out of the refrigerator.
• Place a lemon slice inside a pepper ring and slide it under the skin with the butter mixture. Repeat, one on each breast, and one on each drumstick. Use remaining lemon and pepper slices to fill in any empty gaps.
• Sprinkle turkey cavity with seasoned salt and stuff with lemon and orange quarters, squeezing juice into the cavity as you go.
• Fold the neck skin up over the cavity and secure in place with turkey lacers or long toothpicks. Tie the drumsticks together with kitchen string and tuck the wings under the body, using turkey lacers if needed.
• Rub the turkey skin with olive oil.
• Place flour in oven roasting bag and shake it around.
• Place bag on roasting rack (which is nested in the roasting pan) and layer the bottom of the bag with onion and celery slices (and any other produce left over).
• Place turkey in oven roasting bag and close it with the tie provided.
• Roast until a meat thermometer temperature should register 180 degrees at the thickest area of the thigh. Remove from oven and let the bird rest for thirty minutes.
• Carve the turkey and enjoy!