 My father’s side of the family had gatherings galore. It may have been just the Grandparents and a few aunts, uncles and cousins. Or it may have been the whole shootin match including second cousins of whom I would routinely forget the names.
There were birthdays at the Cousin’s house with baseball in the side yard and playing ‘fort’ in the tree-less tree house.
There were retirement parties with volleyball nets in the back yard of the Great Uncle where I learned diving on your knees is for athletes, with knee guards.
There were Christmases with rousing games of Uno and Pit card games in Grandma’s dining room.
There were Easter Egg hunts at Great Aunt’s house where I said hello to my first snake in a huge pile of wood stacked for the winter.
We ran, played and explored until dark and sometimes into the night chasing lightning bugs and playing flashlight tag through the corn fields. Mom and Dad would give many fair warnings when it was time to go home but we always whined and cried when the minutes ran out. Wide awake and promising we were not tired, we were forced into the car. By the time we arrived home they would have to carry our sleeping bodies to bed.
No gathering was complete without an enormous meal. If you wanted to come to one of our gatherings, you’d better have a dish in your hand to get through the door. We were all about the potlucks. Gone was the belief that one maternal member of the family was to slave away in the kitchen, only to slave away again cleaning up afterwards. Each person had their specialty dish and I looked forward to each one.
My talented mother walked through the door with two, and sometimes three dishes in hand. Deviled Eggs and Green Beans were the ‘expected’ dishes and sometimes, if she had time, there would be a pie or cake in tow.
The next time you find yourself going to a houseful of family I hope you reach for these recipes, I promise they are crowd pleasers. Who knows, maybe you will have so much fun someone will have to carry you to bed.
Deviled Eggs
Ingredients:
12 eggs, hard boiled, peeled and rinsed {how to hard boil eggs}
1 cup Miracle Whip divided into 2 – 1/2 cup measures
1/2 teaspoon cider vinegar
1/4 cup sugar
1/4 teaspoon prepared mustard
Pinch salt
Preparation:
• Carefully slice the eggs in half and put yolks in the mixing bowl of a stand mixer or a bowl suitable for a hand mixer. Place the egg whites on a serving platter to be filled later.
• In a small bowl mix 1/2 cup Miracle Whip with vinegar, sugar and mustard. Let stand for five minutes and stir again.
• Using a stand mixer with the paddle attachment beat the dry egg yolks along with the salt for about thirty seconds. Add the Miracle Whip mixture to the beaten egg yolks and whip until smooth, about thirty seconds.
• Add the remaining Miracle Whip and blend until uniformly mixed.
To fill the eggs:
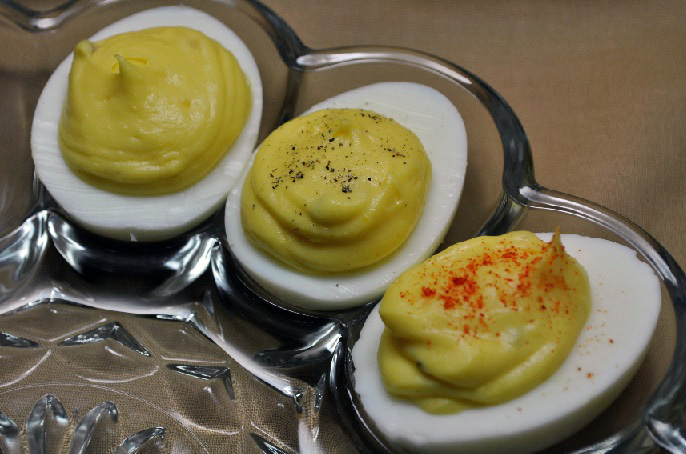
• Scoop egg filling into a pastry bag using a large tip, or a quart-sized zip plastic bag with the corner snipped off. Fill the reserved egg white halves to the inner rim. Once all eggs are filled, use the remaining filling to top off each egg.
• Garnish, if desired. (Good garnishes are: paprika, parsley, sliced olive, pimento, etc.)
• Refrigerate until ready to serve. Make up to two days in advance.
How to Hard Boil Eggs
Put the eggs in a single layer in a saucepan, completely cover with cold water. Turn the burner on high and bring the water to a boil. As soon as the water starts to boil reduce the heat to low. Let simmer for twelve minutes. Remove the eggs with a slotted spoon and place them into a bowl of ice water (or strain the water from the pan, fill the pan with cold water, strain again, fill again, until the eggs cool down). Let eggs cool until easily handled with bare hands. Refrigerate for up to four days or proceed making deviled eggs.
Hints – Fresh eggs can be hard to peal, so buying them a week before the event is a good plan. If eggs are still hard to peal, try refrigerating them for a few hours (if you have time) and try again.
Mom’s Green Beans for a Crowd
Ingredients:
1/2 pound bacon, cut into 1 inch pieces
1 can (8 pound, 5 ounce) cut green beans
salt to taste (about ¼ – ½ teaspoon)
pepper taste (about ¼ – ½ teaspoon)
Preparation:
• In a large, deep pan fry the bacon until crisp. Remove the bacon pieces with a slotted spoon and drain on a paper towel. Set aside.
• Pour the bacon grease from the pan, but to not wipe it clean. Leave the bits of bacon in the pan and a small amount of grease. Discard or refrigerate the remaining grease for other recipes.
• Drain the green beans, reserving 1 cup of the liquid.
• Pour the reserved liquid in the pan used to fry the bacon. Bring to a boil and stir to loosen the stuck-on bacon pieces.
• Salt and pepper the resulting broth to taste.
• Add the drained green beans to the broth in the pan. Carefully stir, coating the green beans with the seasoned broth.
• Salt and pepper the green beans to taste, if needed.
• Place in a warm oven or transfer to a crock pot set on low until ready to serve.